* feat: nocobase build

* chore: update build scripts

* chore: update build scripts

* chore(versions): 😊 publish v0.7.0-alpha.33

* chore: independent version

* chore: nocobase build

* chore(versions): 😊 publish v0.7.0-alpha.34

* feat: nocobase-cli

* feat: nocobase-cli

* chore: update dependencies

* feat: improve code

* refactor: create-nocobase-app

* chore(versions): 😊 publish v0.7.0-alpha.35

* feat: @nocobase/devtools

* chore(versions): 😊 publish v0.7.0-alpha.36

* chore: update dependencies

* chore(versions): 😊 publish v0.7.0-alpha.37

* feat: improve code

* chore(versions): 😊 publish v0.7.0-alpha.38

* feat: improve code

* chore(versions): 😊 publish v0.7.0-alpha.39

* feat: update deps

* chore(versions): 😊 publish v0.7.0-alpha.40

* chore: update devDependencies

* chore(versions): 😊 publish v0.7.0-alpha.41

* fix: postinstall

* chore(versions): 😊 publish v0.7.0-alpha.42

* chore: improve code

* chore(versions): 😊 publish v0.7.0-alpha.43

* chore: execa

* chore(versions): 😊 publish v0.7.0-alpha.44

* chore(cli): allow unknown option

* chore(versions): 😊 publish v0.7.0-alpha.45

* fix: default envs

* chore(versions): 😊 publish v0.7.0-alpha.45

* fix: package argument for build command

* chore(versions): 😊 publish v0.7.0-alpha.46

* fix: improve code

* chore(versions): 😊 publish v0.7.0-alpha.48

* feat: clean & doc

* chore(versions): 😊 publish v0.7.0-alpha.49

* feat: compilation tips

* feat: upgrade command

* chore(versions): 😊 publish v0.7.0-alpha.50

* fix: unexpected token ] in JSON

* chore(versions): 😊 publish v0.7.0-alpha.51

* fix: upgrade command

* chore(versions): 😊 publish v0.7.0-alpha.52

* fix: remove export action from available action

* fix: db sync after upgrade

* chore(versions): 😊 publish v0.7.0-alpha.53

* feat: upgrade log

* chore(versions): 😊 publish v0.7.0-alpha.54

* docs: updates

* feat: updates

* docs(cli): update usage description

* feat: updates

* docs: updates

* docs: updates

* docs: toc

* feat: sdk

* docs: updates

* docs: updates

* docs: updates

* Update index.md

* docs: updates

* Update release-notes.md

* Update roadmap.md

* Update index.md

* Update contributing.md

* Update contributing.md

* Update index.md

* Update index.md

* Update nocobase-cli.md

* Update nocobase-cli.md

* fix: user plugin initialization data

* Update env.md

* Update env.md

* Update directory-structure.md

* Update index.md

* Update action-api.md

* Update filter-operators.md

* docs: update thanks.md

* Update index.md

* Update javascript-sdk.md

* Update rest-api.md

* Update installation.md

* Update installation.md

* Update upgrading.md

* Update upgrading.md

* Update upgrading.md

* Update installation.md

* Update installation.md

* Create release-notes.md

* Update release-notes.md

* feat: updates

* feat: update docs

* feat: update release-notes.md

* feat: switch language

* feat: updates

* Add files via upload

* Add files via upload

* Update important-features.md

* Update thanks.md

* feat: nocobase postinstall

* Update index.md

* Create why-different.md

* Update why-different.md

* Create who-is-for.md

* Rename who-is-for.md to who.md

* feat: update docs

* Rename why-different.md to why.md

* Update why.md

* Update menus.ts

* Update why-nocobase.md

* Create who.md

* Create why.md

* feat: updates

* chore(versions): 😊 publish v0.7.0-alpha.55

* feat: tips

* Update who.md

* Update who.md

* feat: update docs

* feat: update doc menus

* fix: plugin client dist

* docs: update contributing.md

* docs: update readme.md

* docs: update readme.md

* docs: update readme.md

* Update functional-zoning.md

* fix: br

Co-authored-by: Zhou <zhou.working@gmail.com>
4.1 KiB
5 minutes to get started
Let's take 5 minutes to build an order management system using NocoBase.
1. Create data collections and fields
In this order management system, we need to have the information of Customers,Products,Orders which are interrelated with each other. We need to create 4 data tables and their fields as follows:
- Customers
- Name
- Birthday
- Gender
- Phone
- Orders (All orders purchased, data from
Orders, each customer data contains multiple order data)
- Products
- Product name
- Description
- Images
- Price
- Order Details (In which orders the product was purchased, data from
Order Details, each product data belongs to multiple order details data)
- Orders
- Serial number
- Total
- Note
- Address
- Customer (Customers who own the order, data from
Customers, each order data belongs to a customer data) - Order details (The products in the order, data from
Order Details, each order data contains multiple order details data)
- Order Details
- Order (The order to which the detail belongs, data from
Orders, each order detail data belongs to an order data) - Product (The products contained in this detail, data from
Products, each order detail data contains a product data) - Quantity
- Order (The order to which the detail belongs, data from
Where the fields with underscores are relational fields, associated to other data tables.
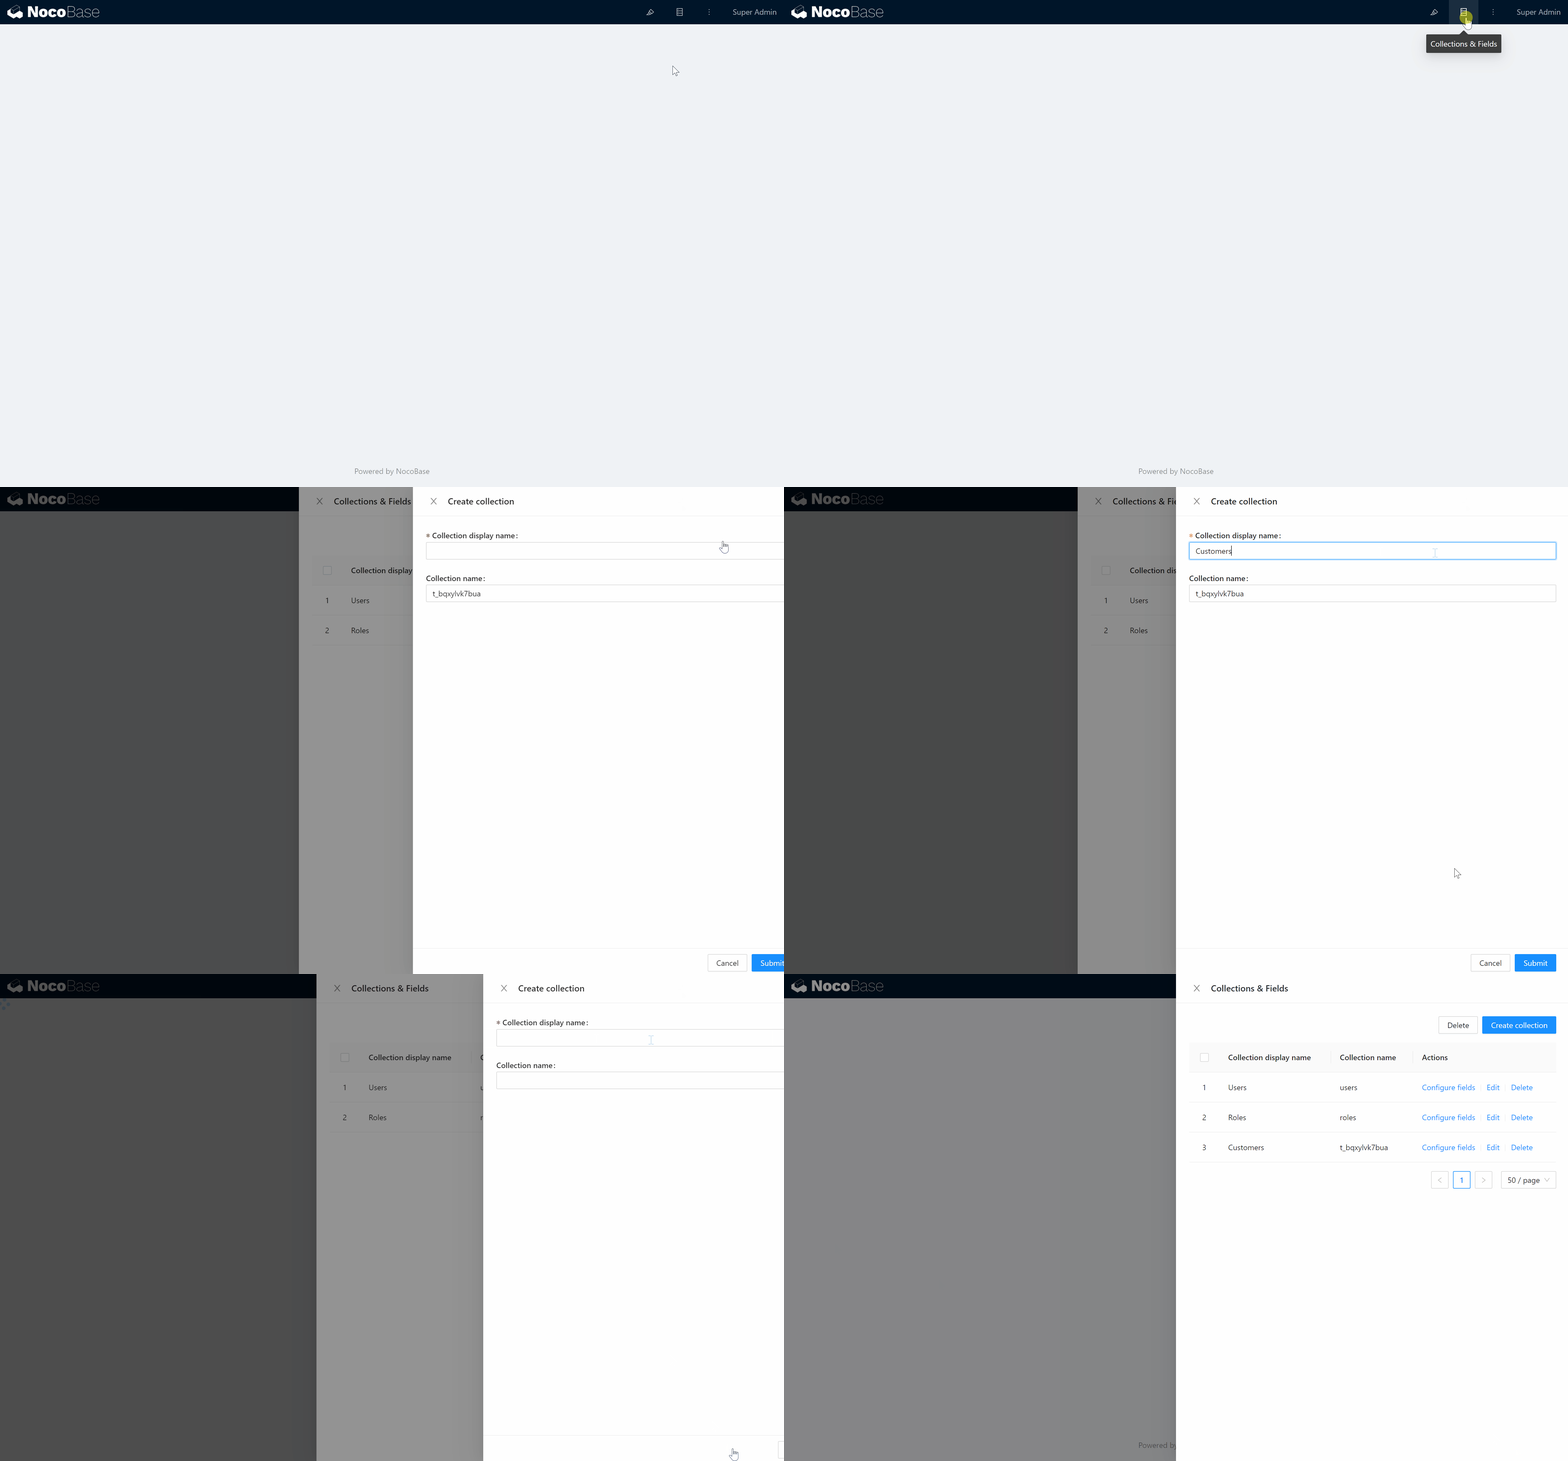
Next, click the "Collections & Fields" button to enter the Configuration screen and create the first Collection Customers.
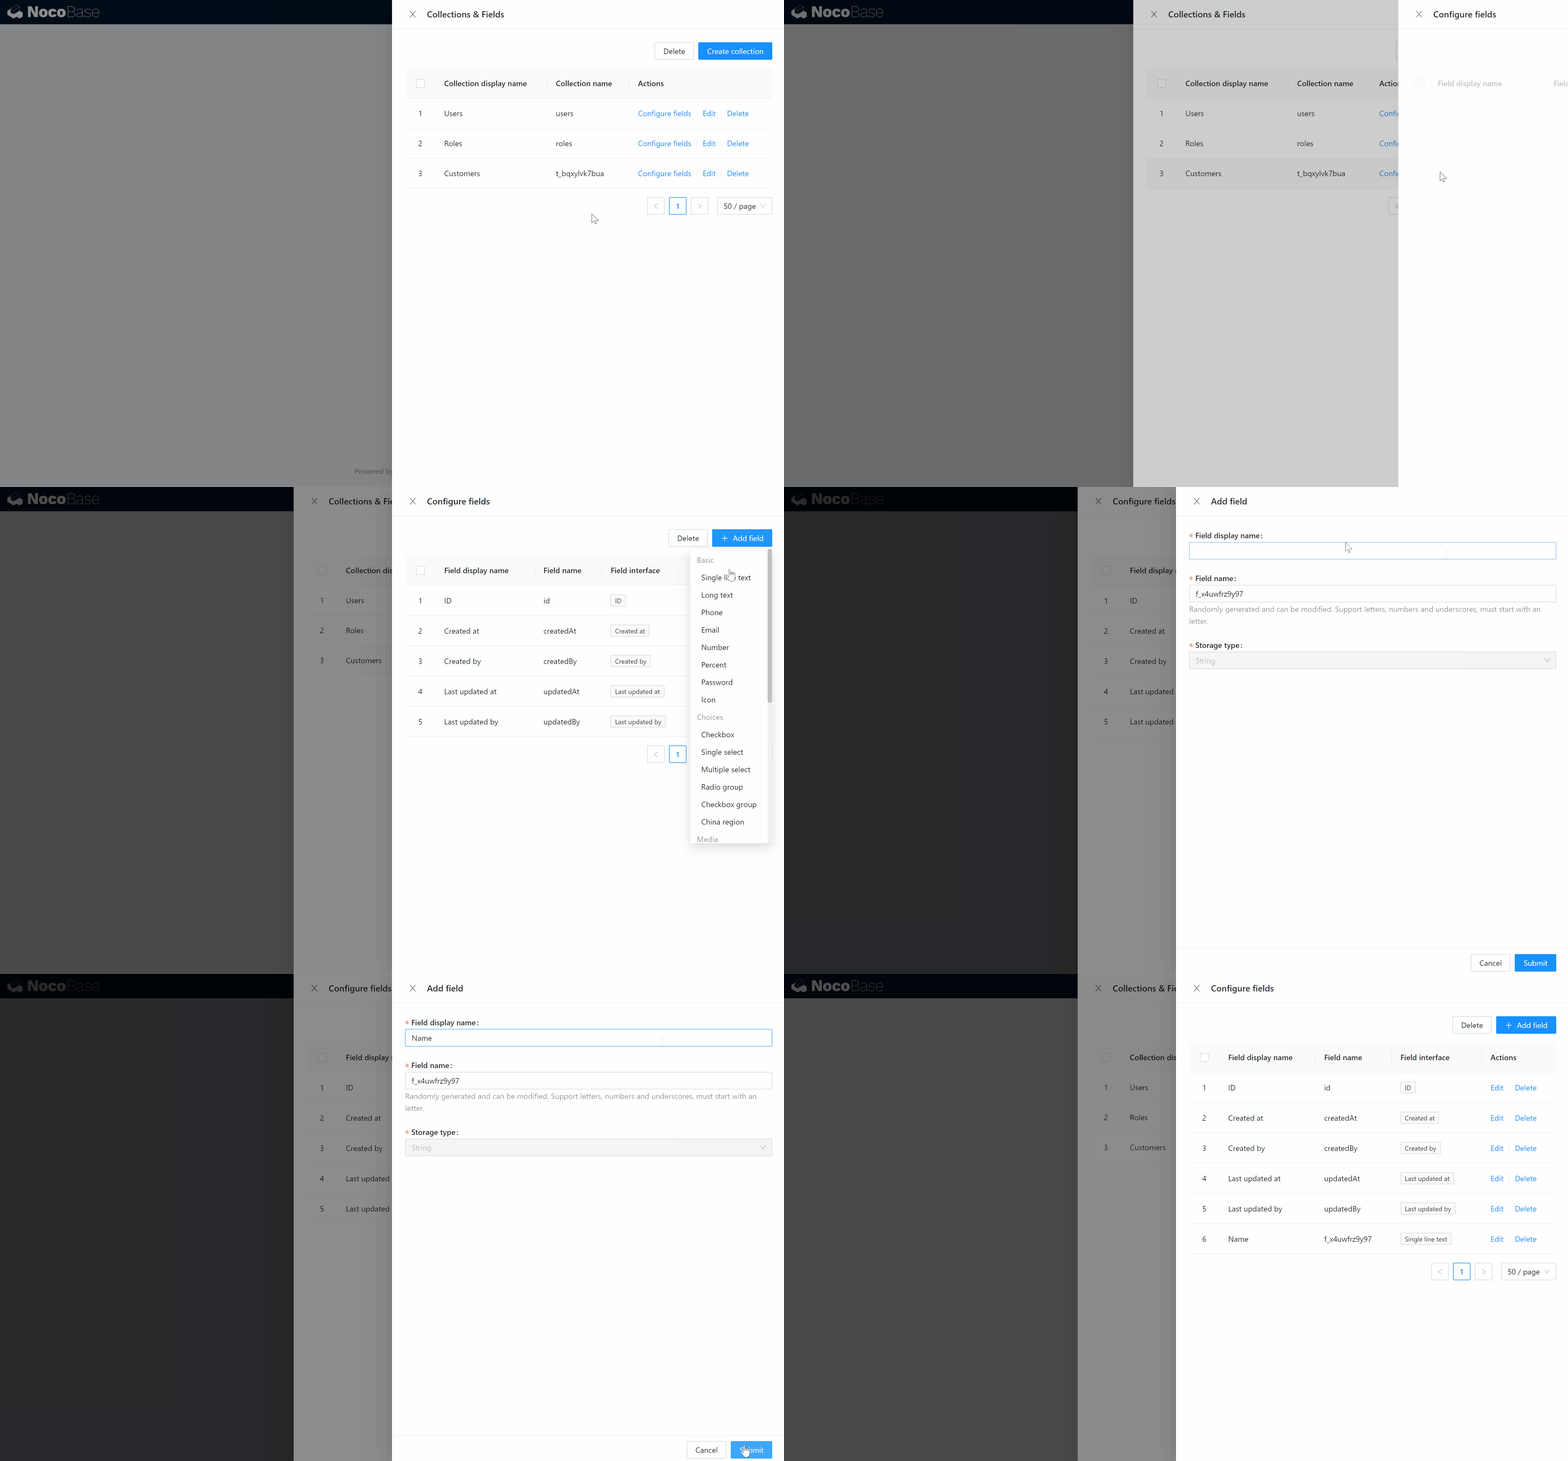
Then click on "Configure fields" to add a name field for Customers, which is a Single line text type.
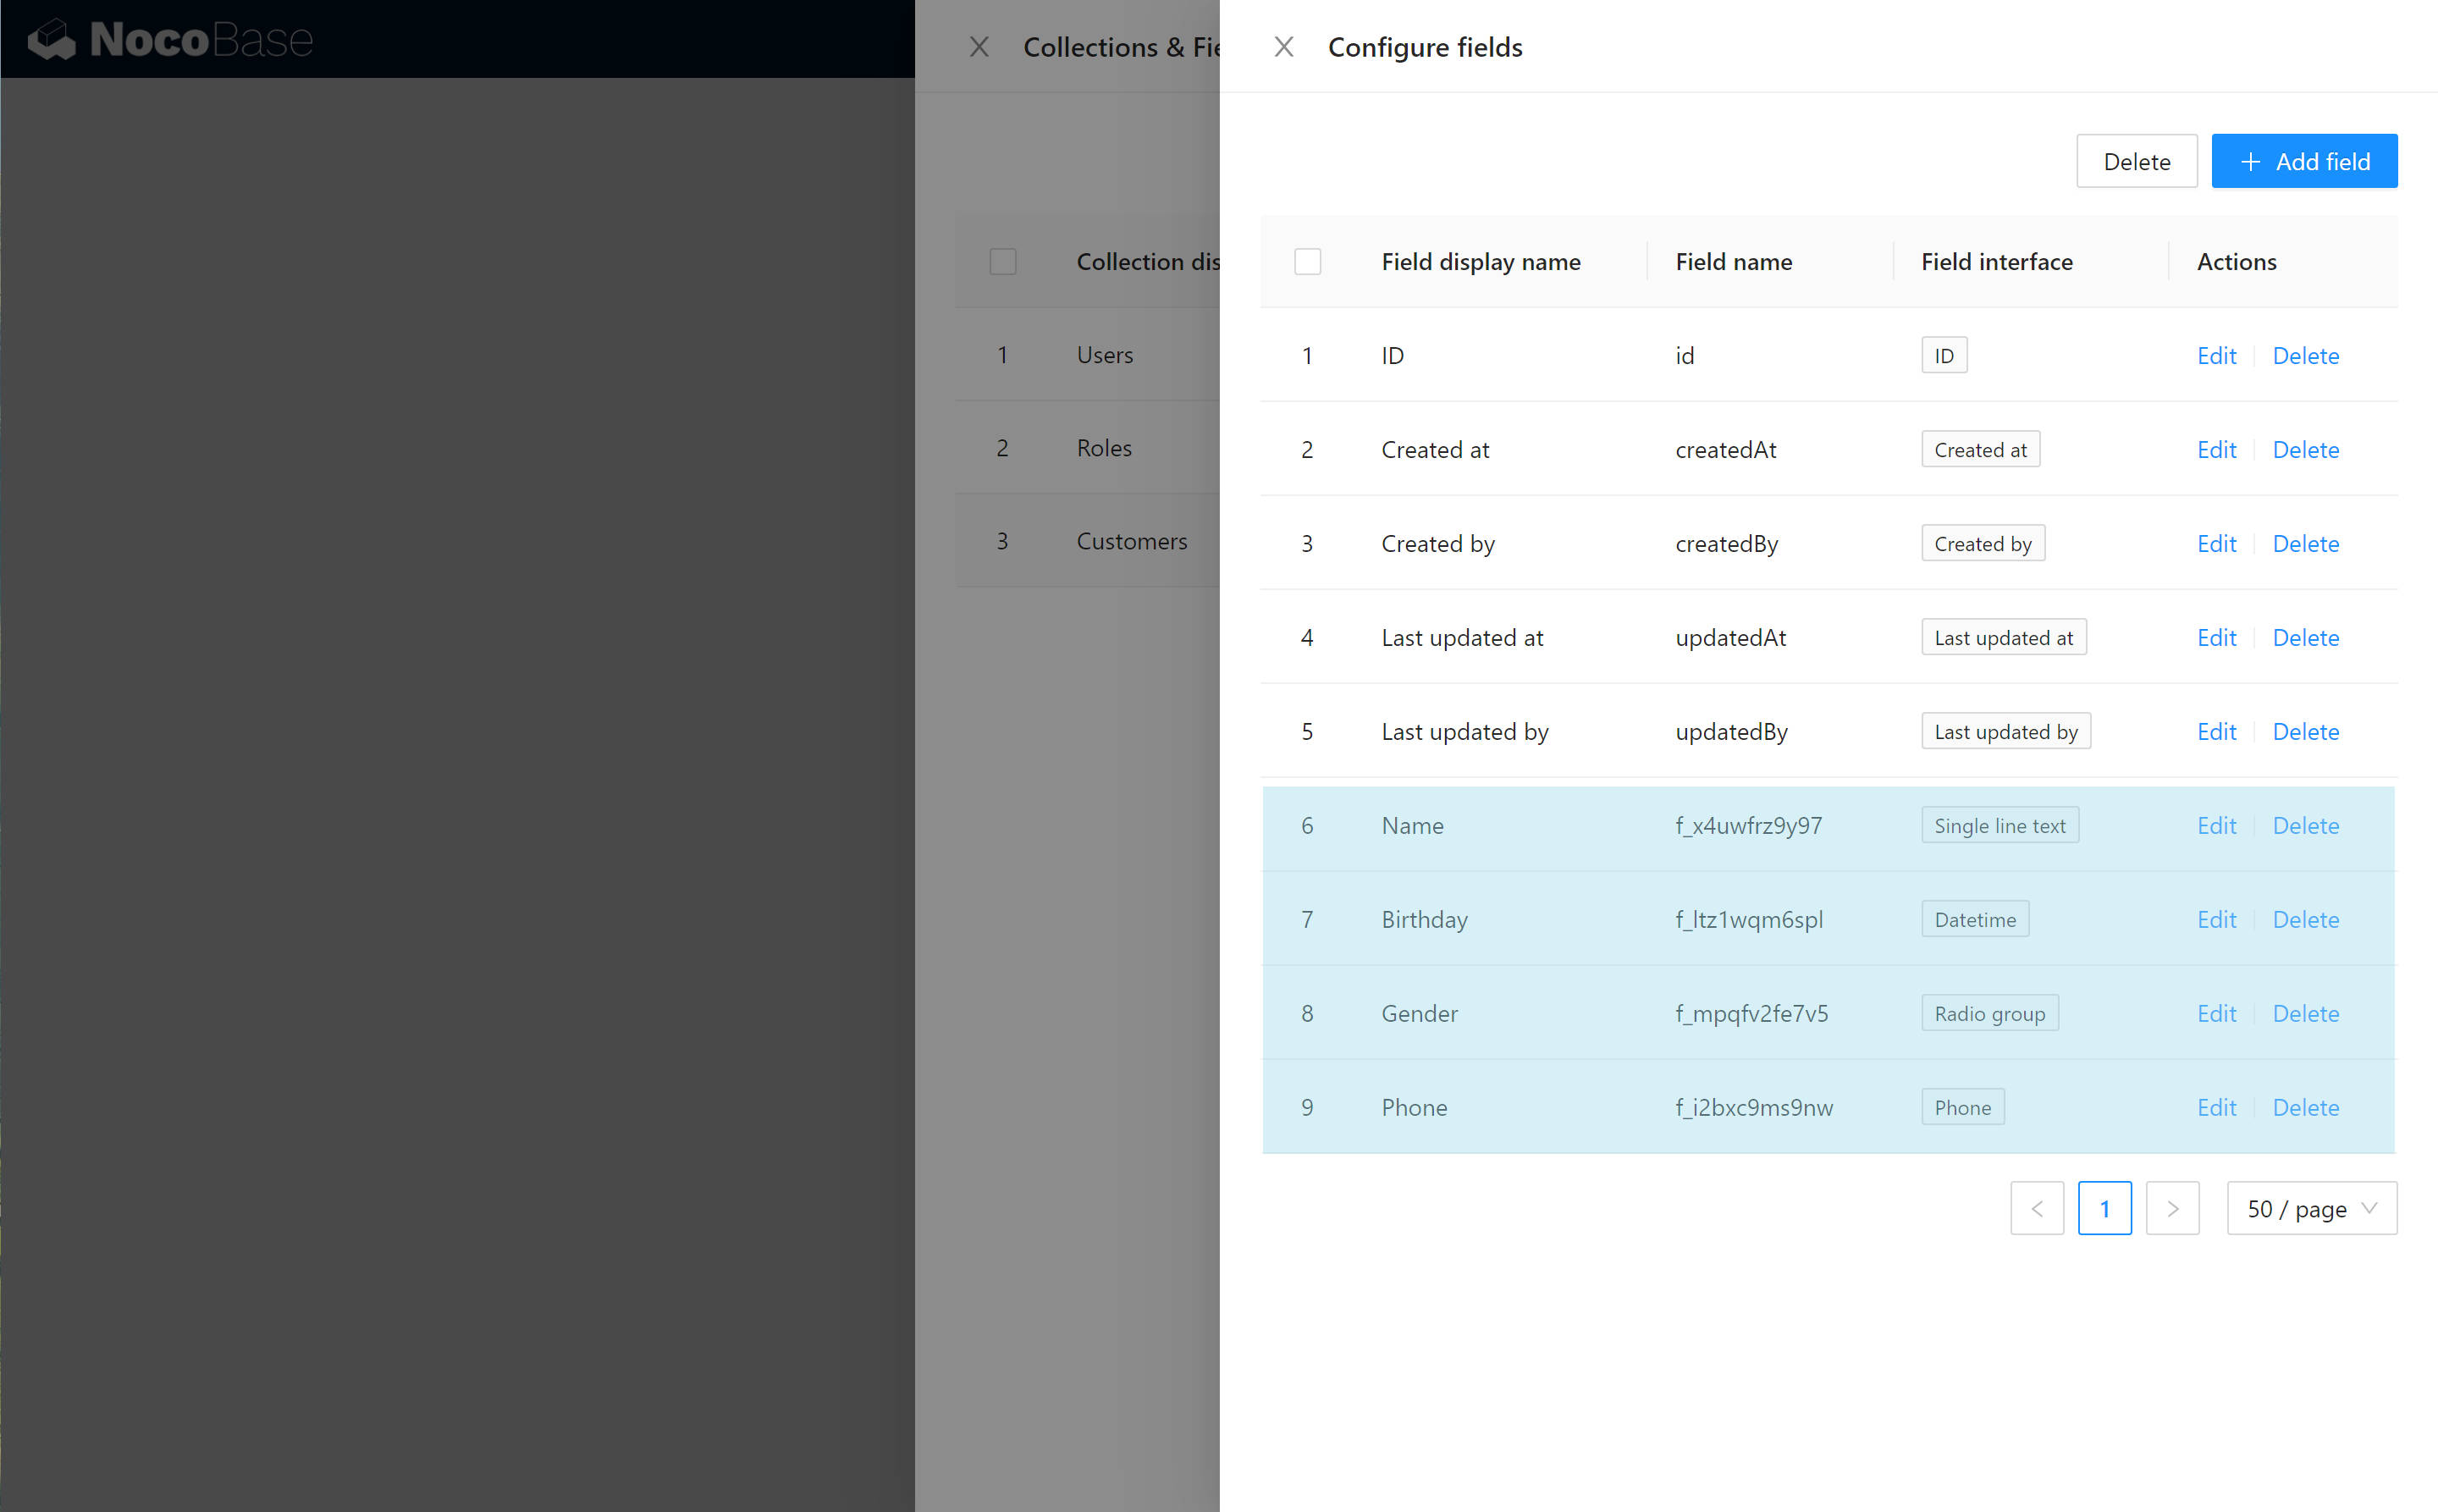
In the same way, add Birthday, Gender, and Phone for Customers, which are the Datetime type, Radio group type, and Phone type respectively.
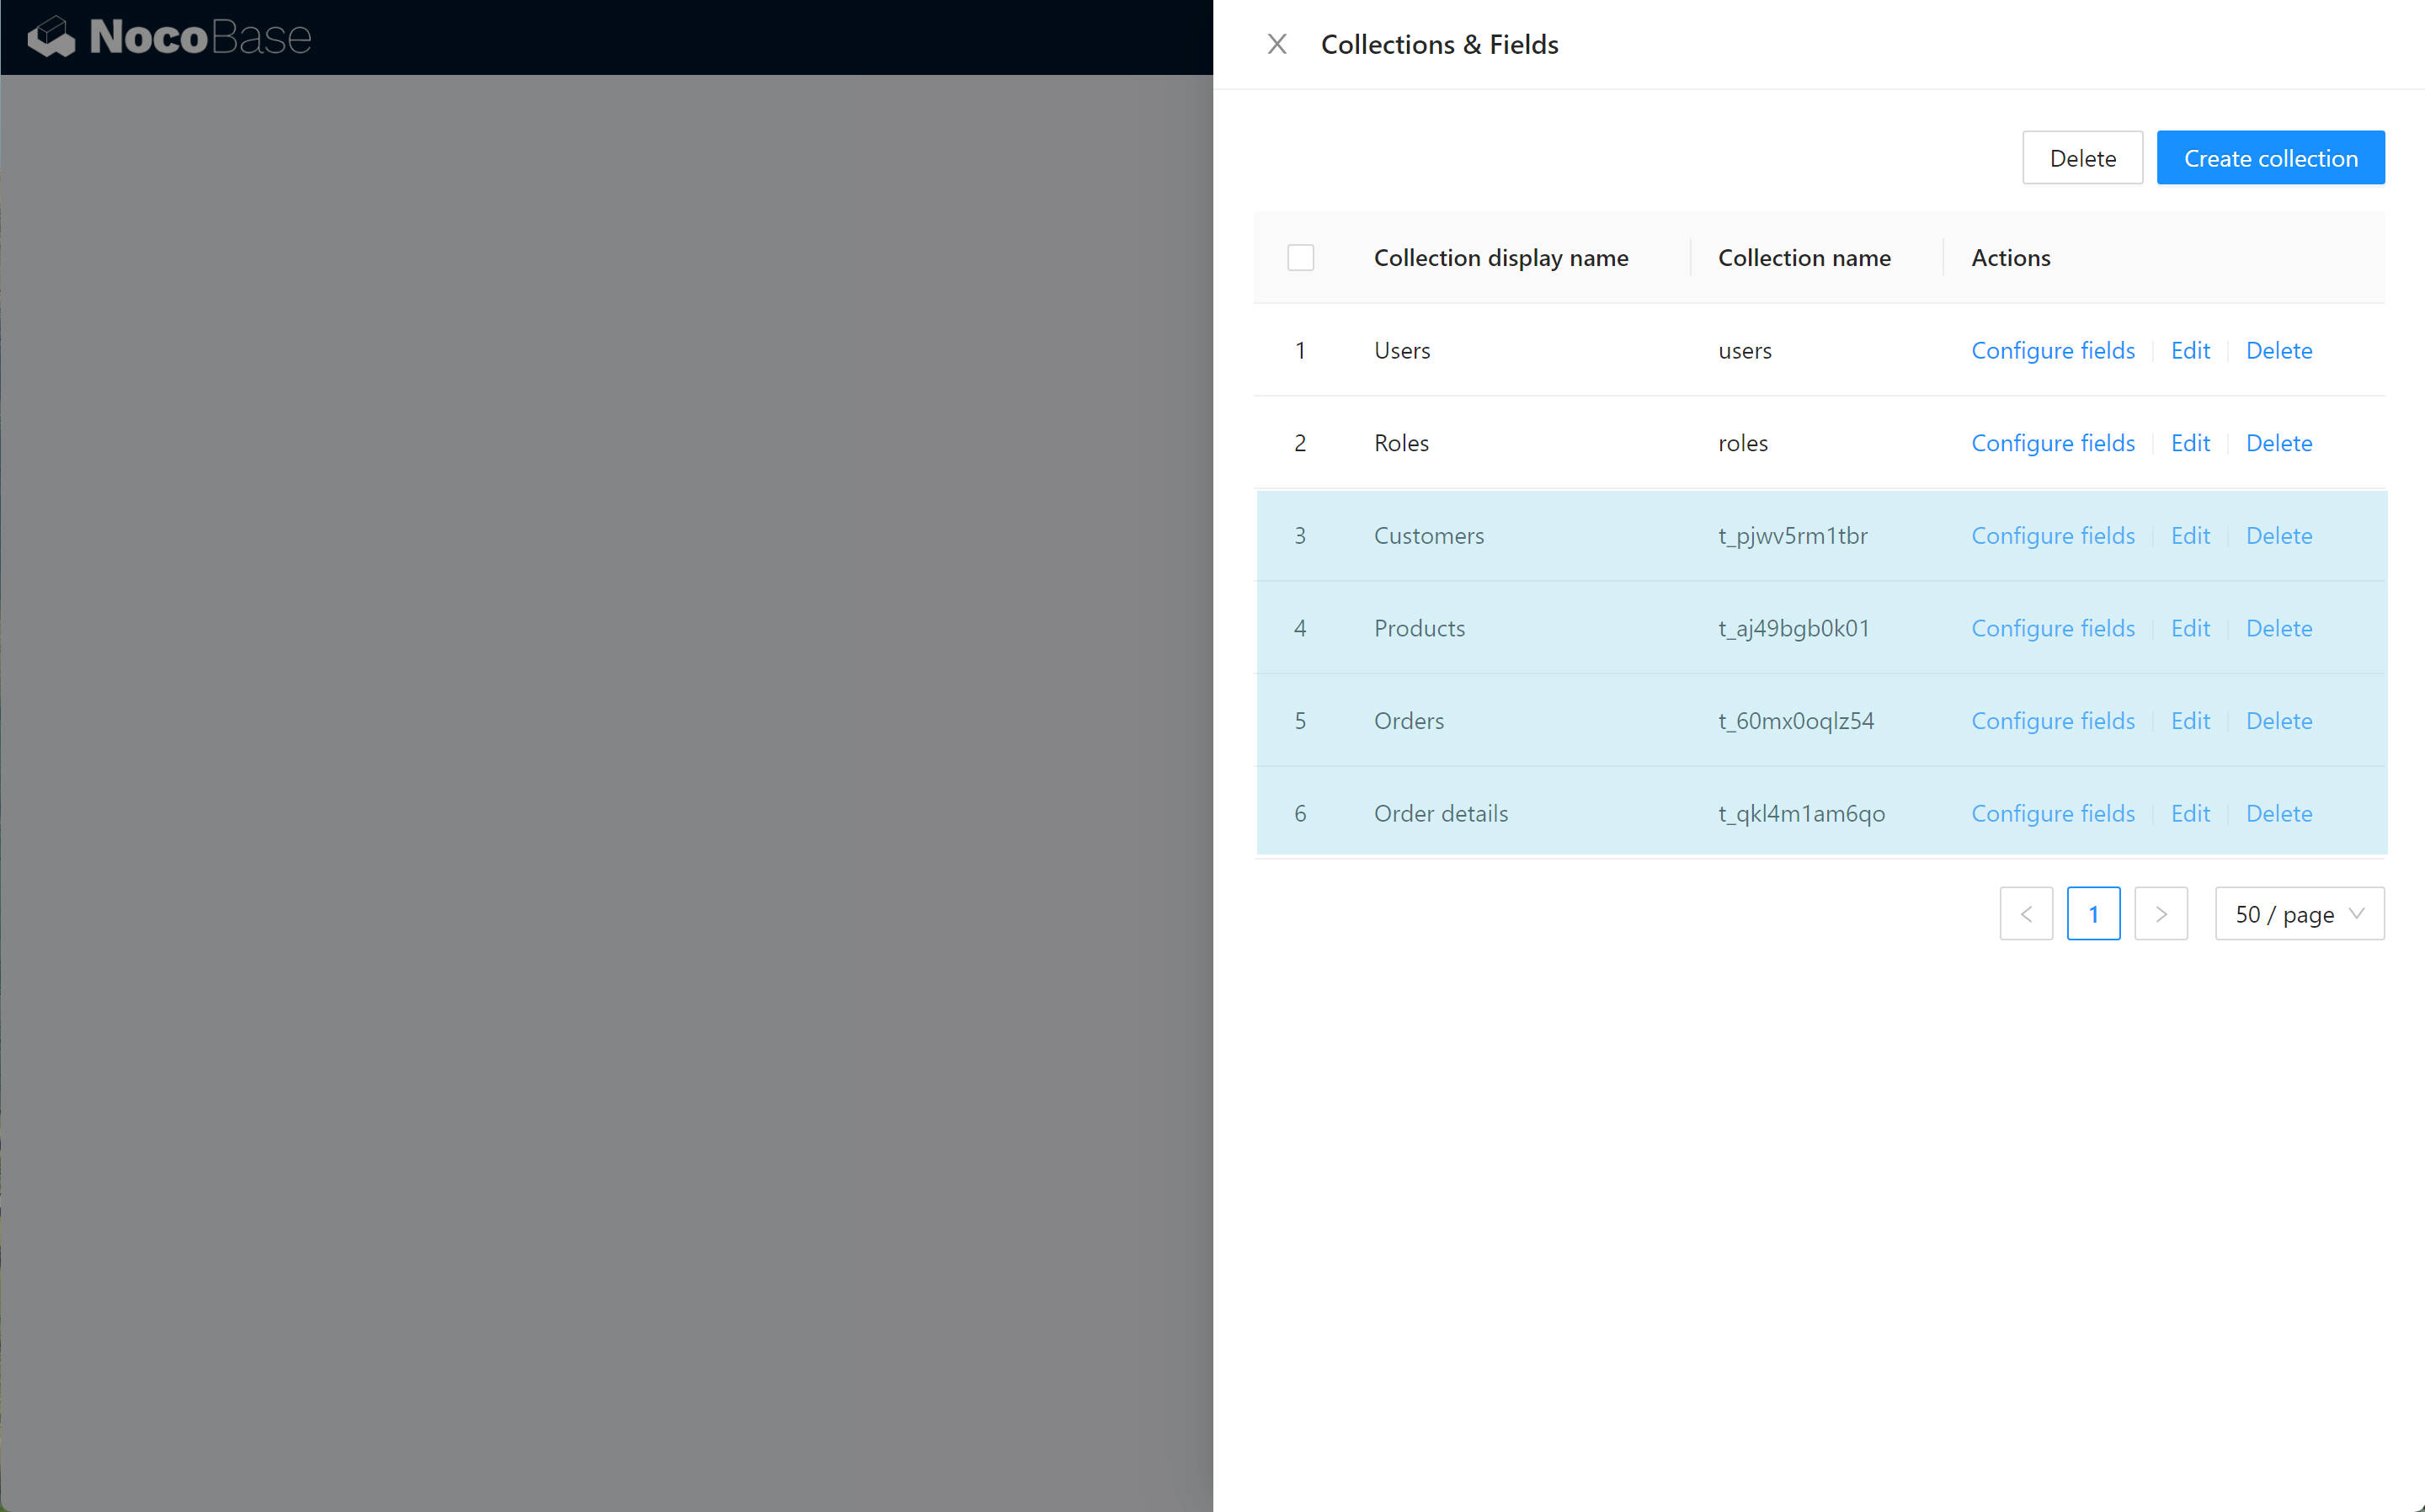
In the same way, create Collections Products, Orders, Order Details and their fields.
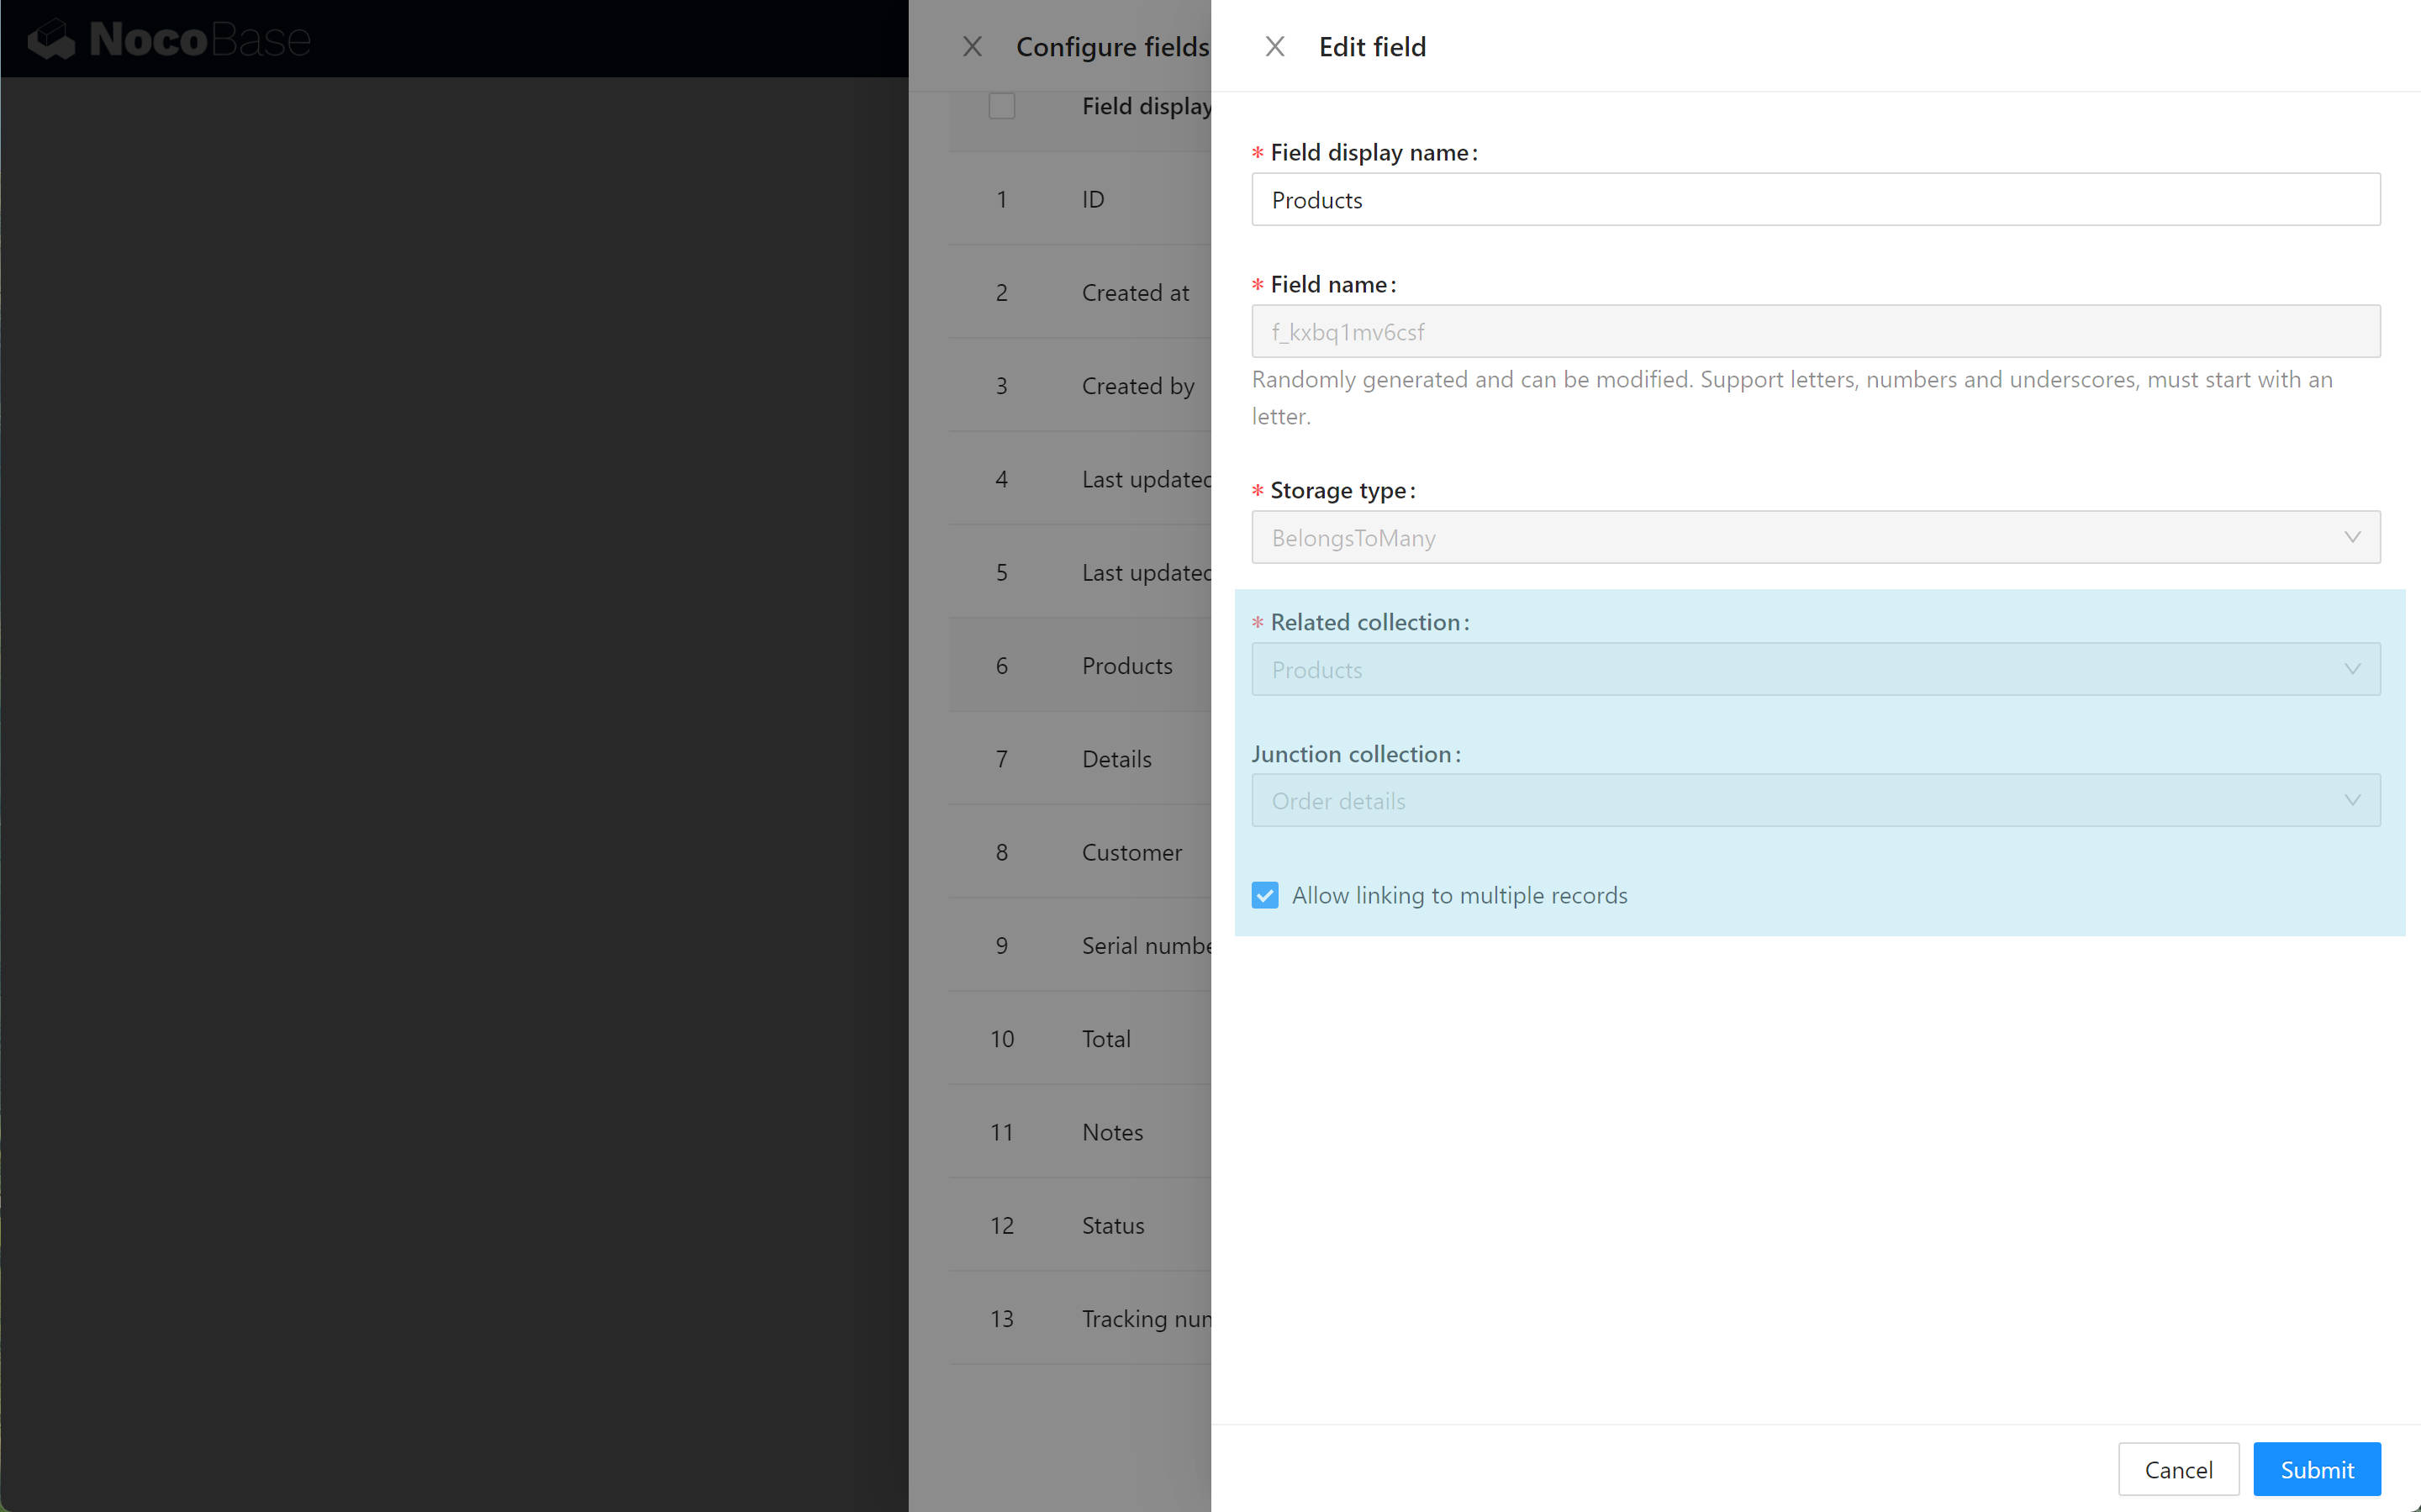
In this case, for the relationship fields, we have to select the Link to type, thus creating an association between the data collections. In this example, we associate Products with Orders and use Order Details as an junction collection.
Once the data collections and fields are created, we start making the interface.
2. Configure menus and pages
We need three pages for customers, orders, and products to display and manage our data.
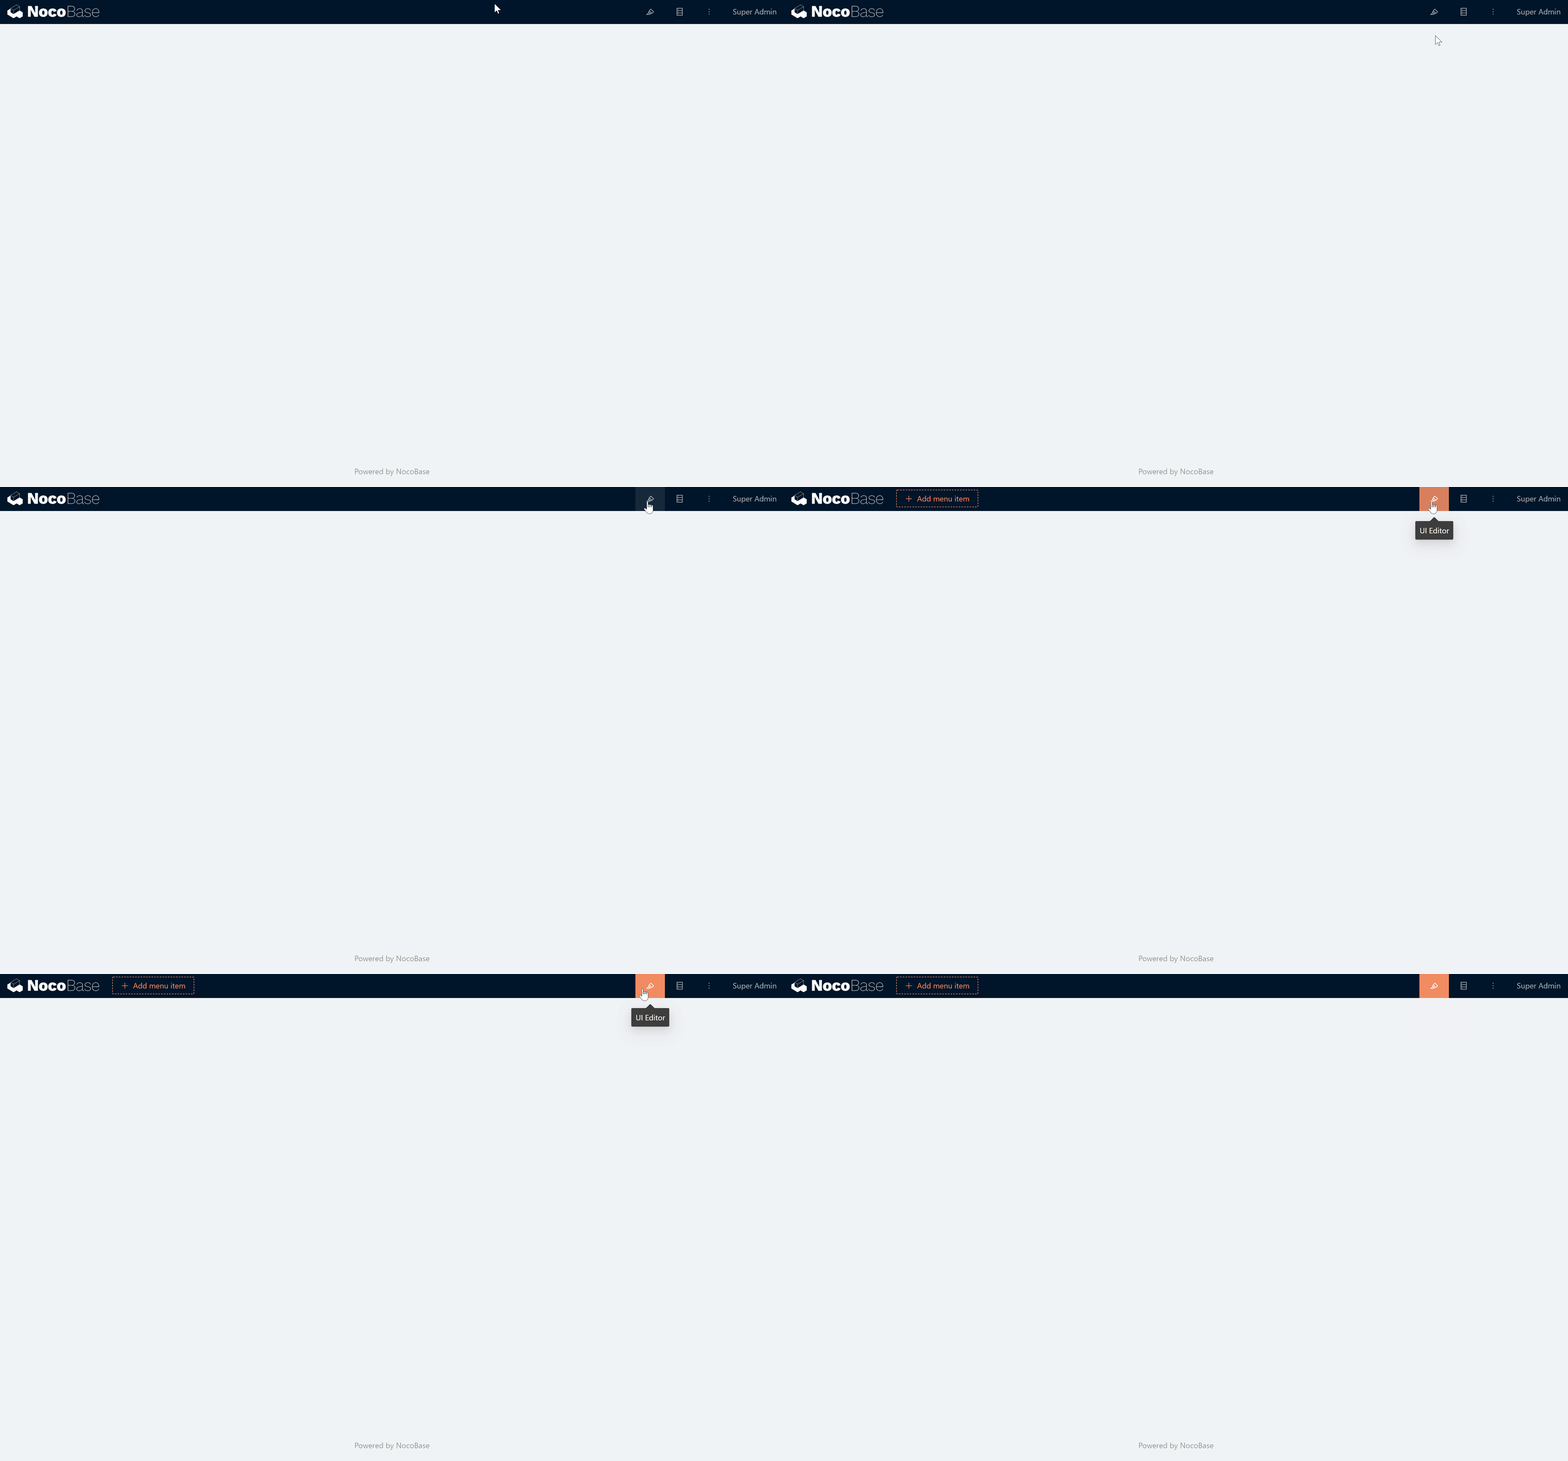
Click the UI Editor button to enter the interface configuration mode. In this mode, we can add menu items, add pages, and arrange blocks within the pages.
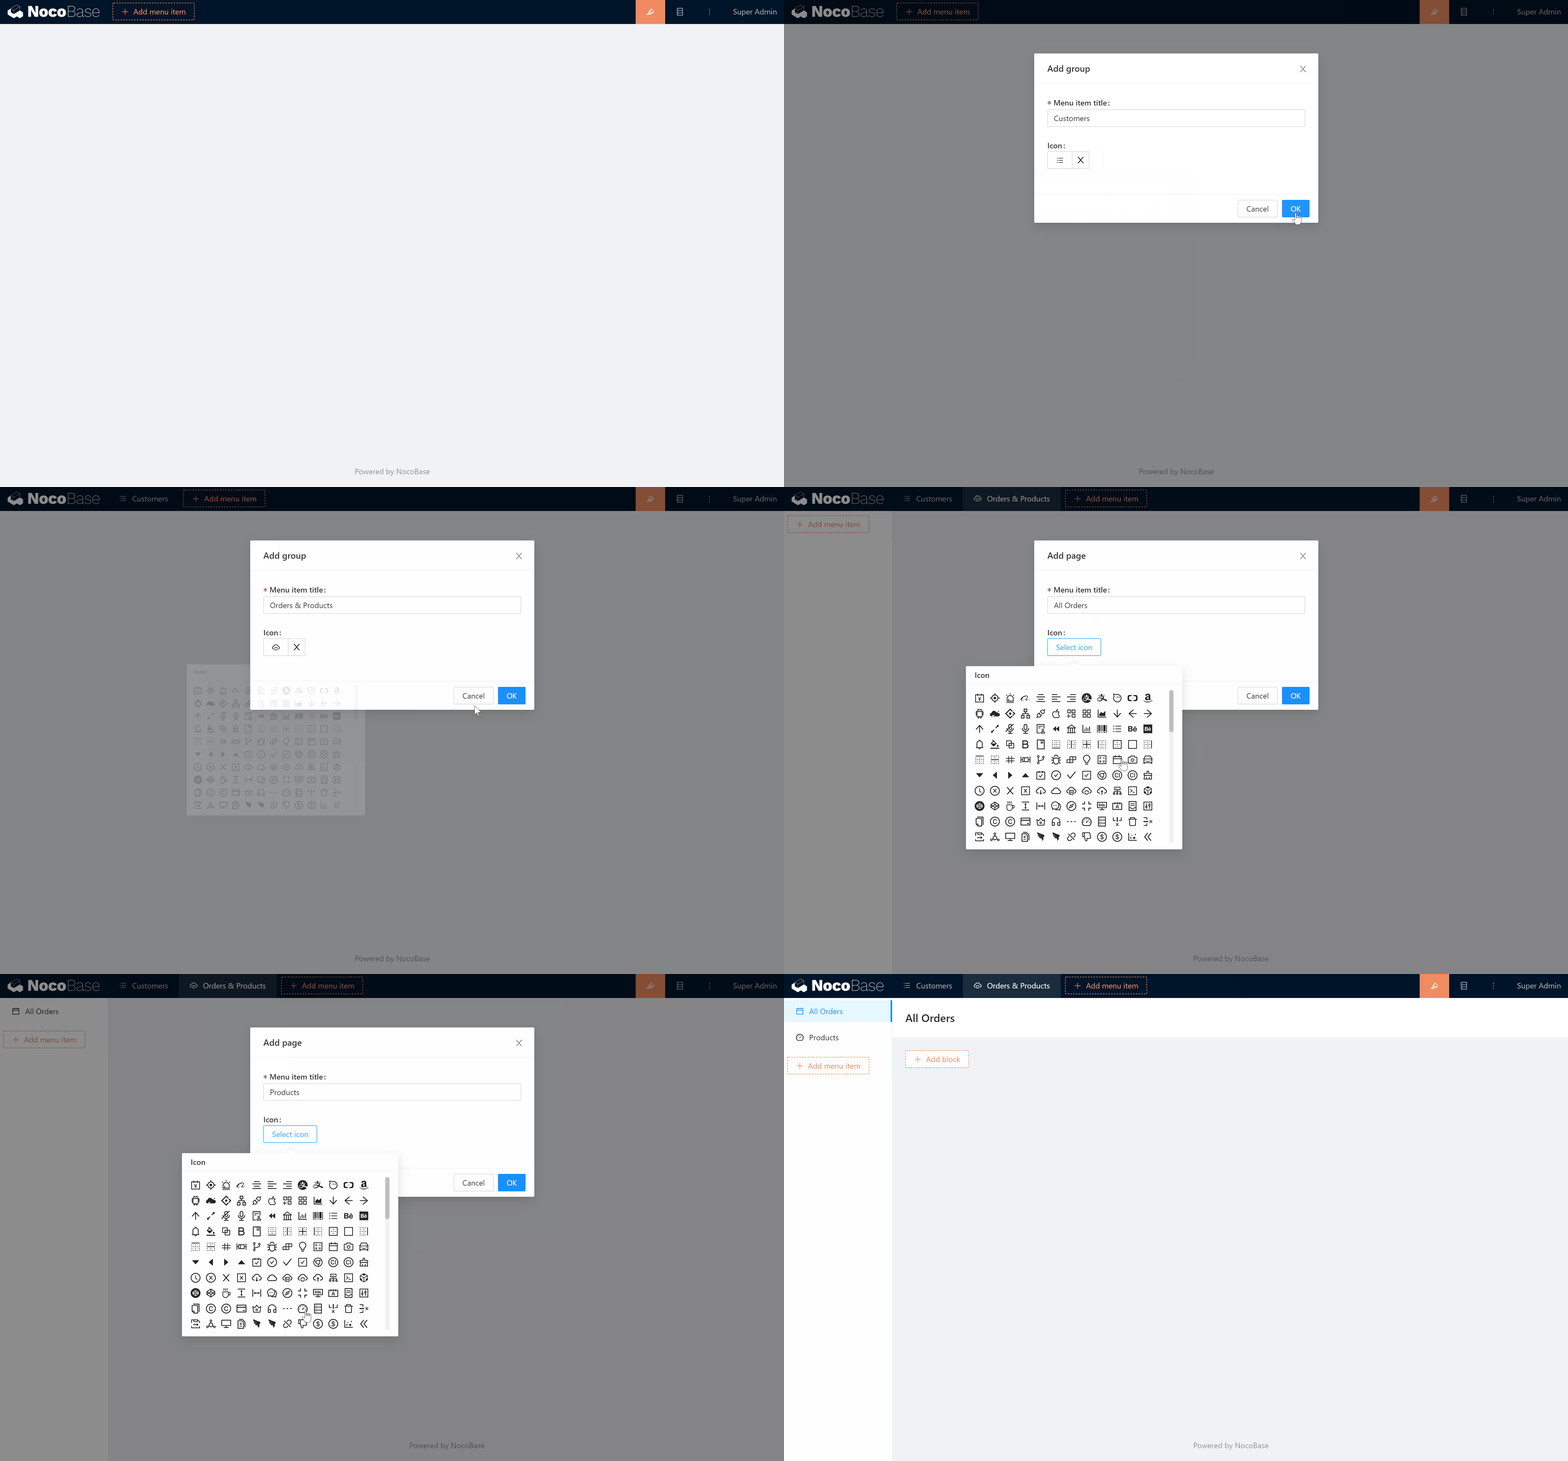
Click Add menu item, add menu groups "Customers" and "Orders & Products", then add submenu pages "All Orders" and "Products".
After adding menus and pages, we can add and configure blocks within the pages.
3. Adding and Configuring Blocks
NocoBase currently supports table, kanban, calendar, form, details, and other types of blocks that present data from a data collection and allow manipulation of the data. Obviously, customers, orders, and products are suitable for displaying and manipulating in a table block.
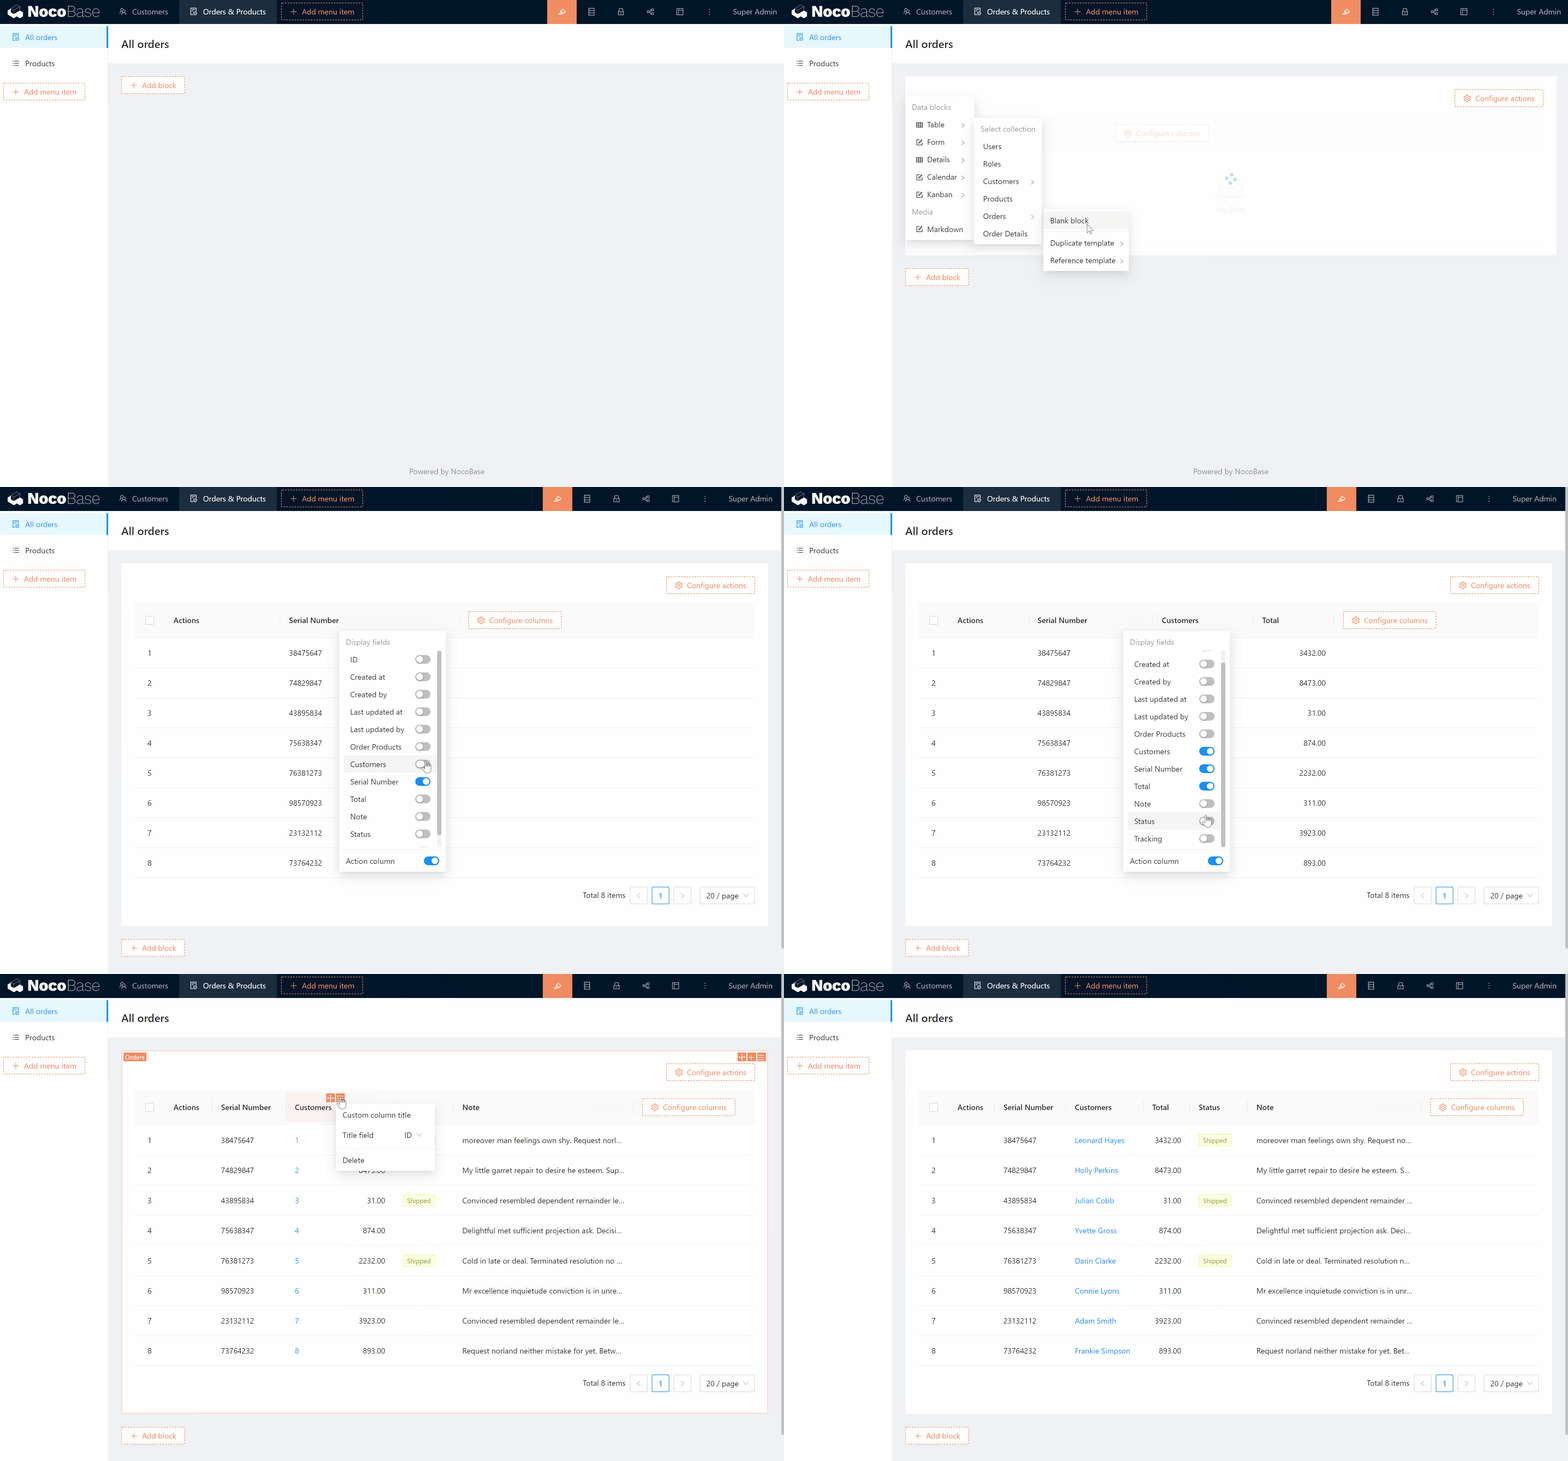
We add a table block to the "All Orders" page, select Collection Orders as the data source, and configure the columns to be displayed for this table block.
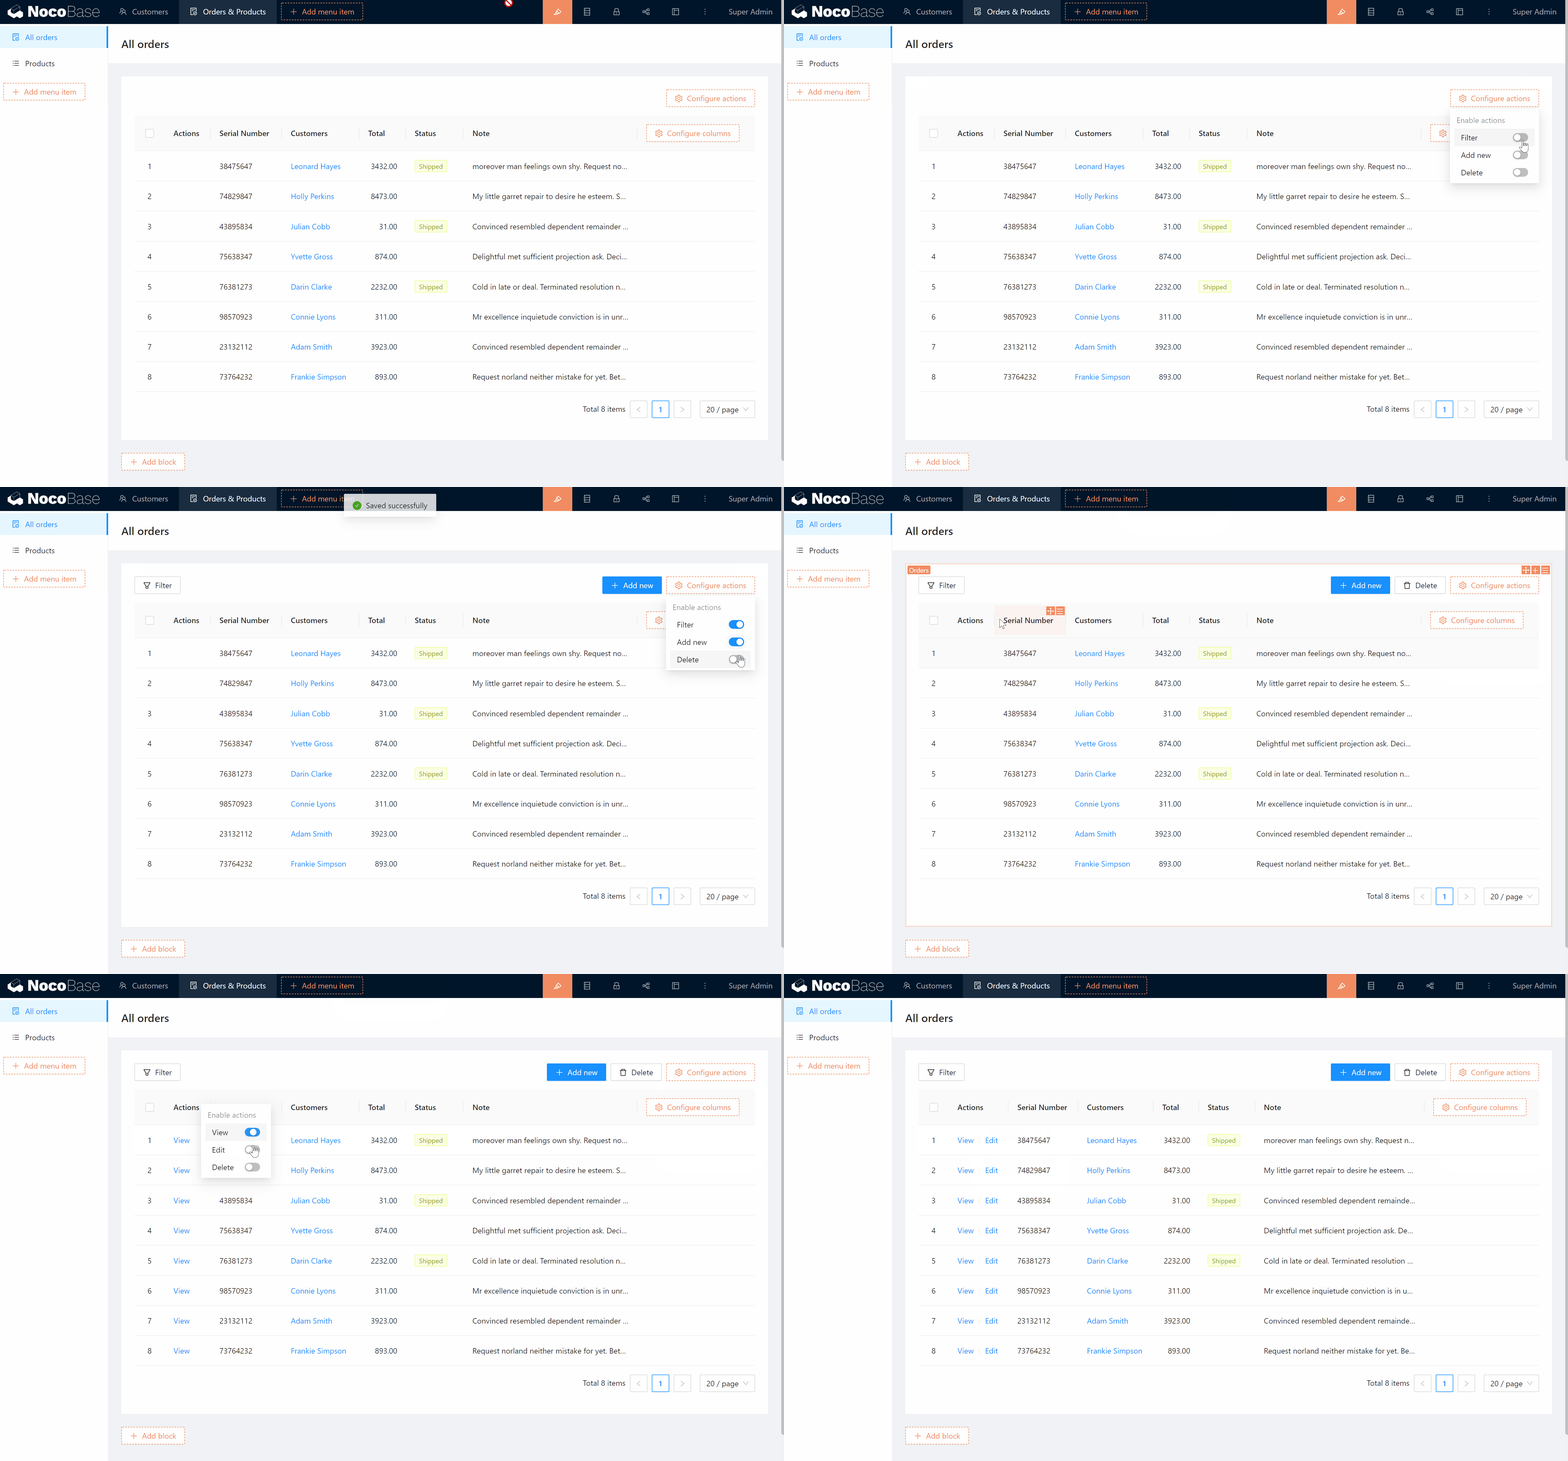
Configure actions for this table block, including filter, add, delete, view, and edit.
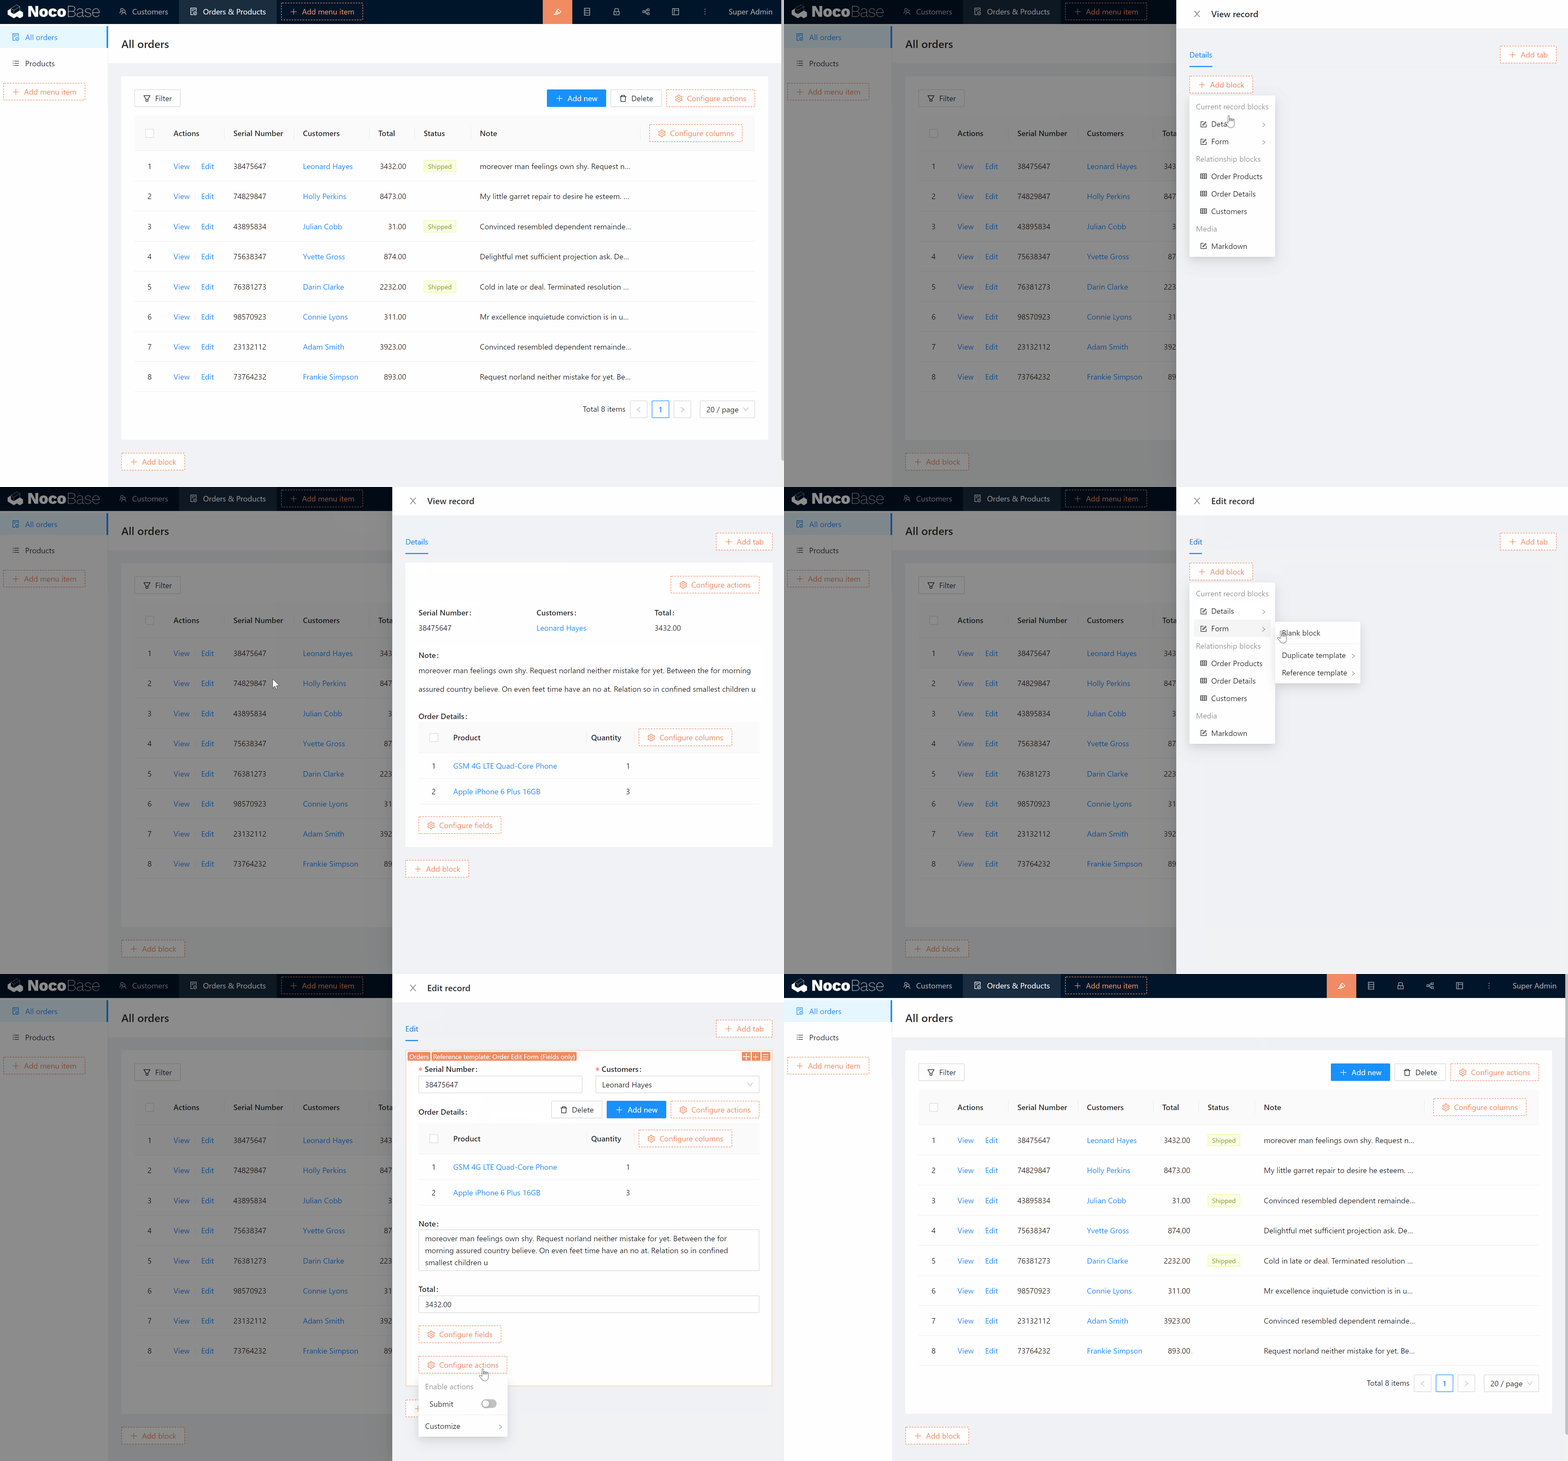
Configure form and detail blocks for add, edit, view actions.
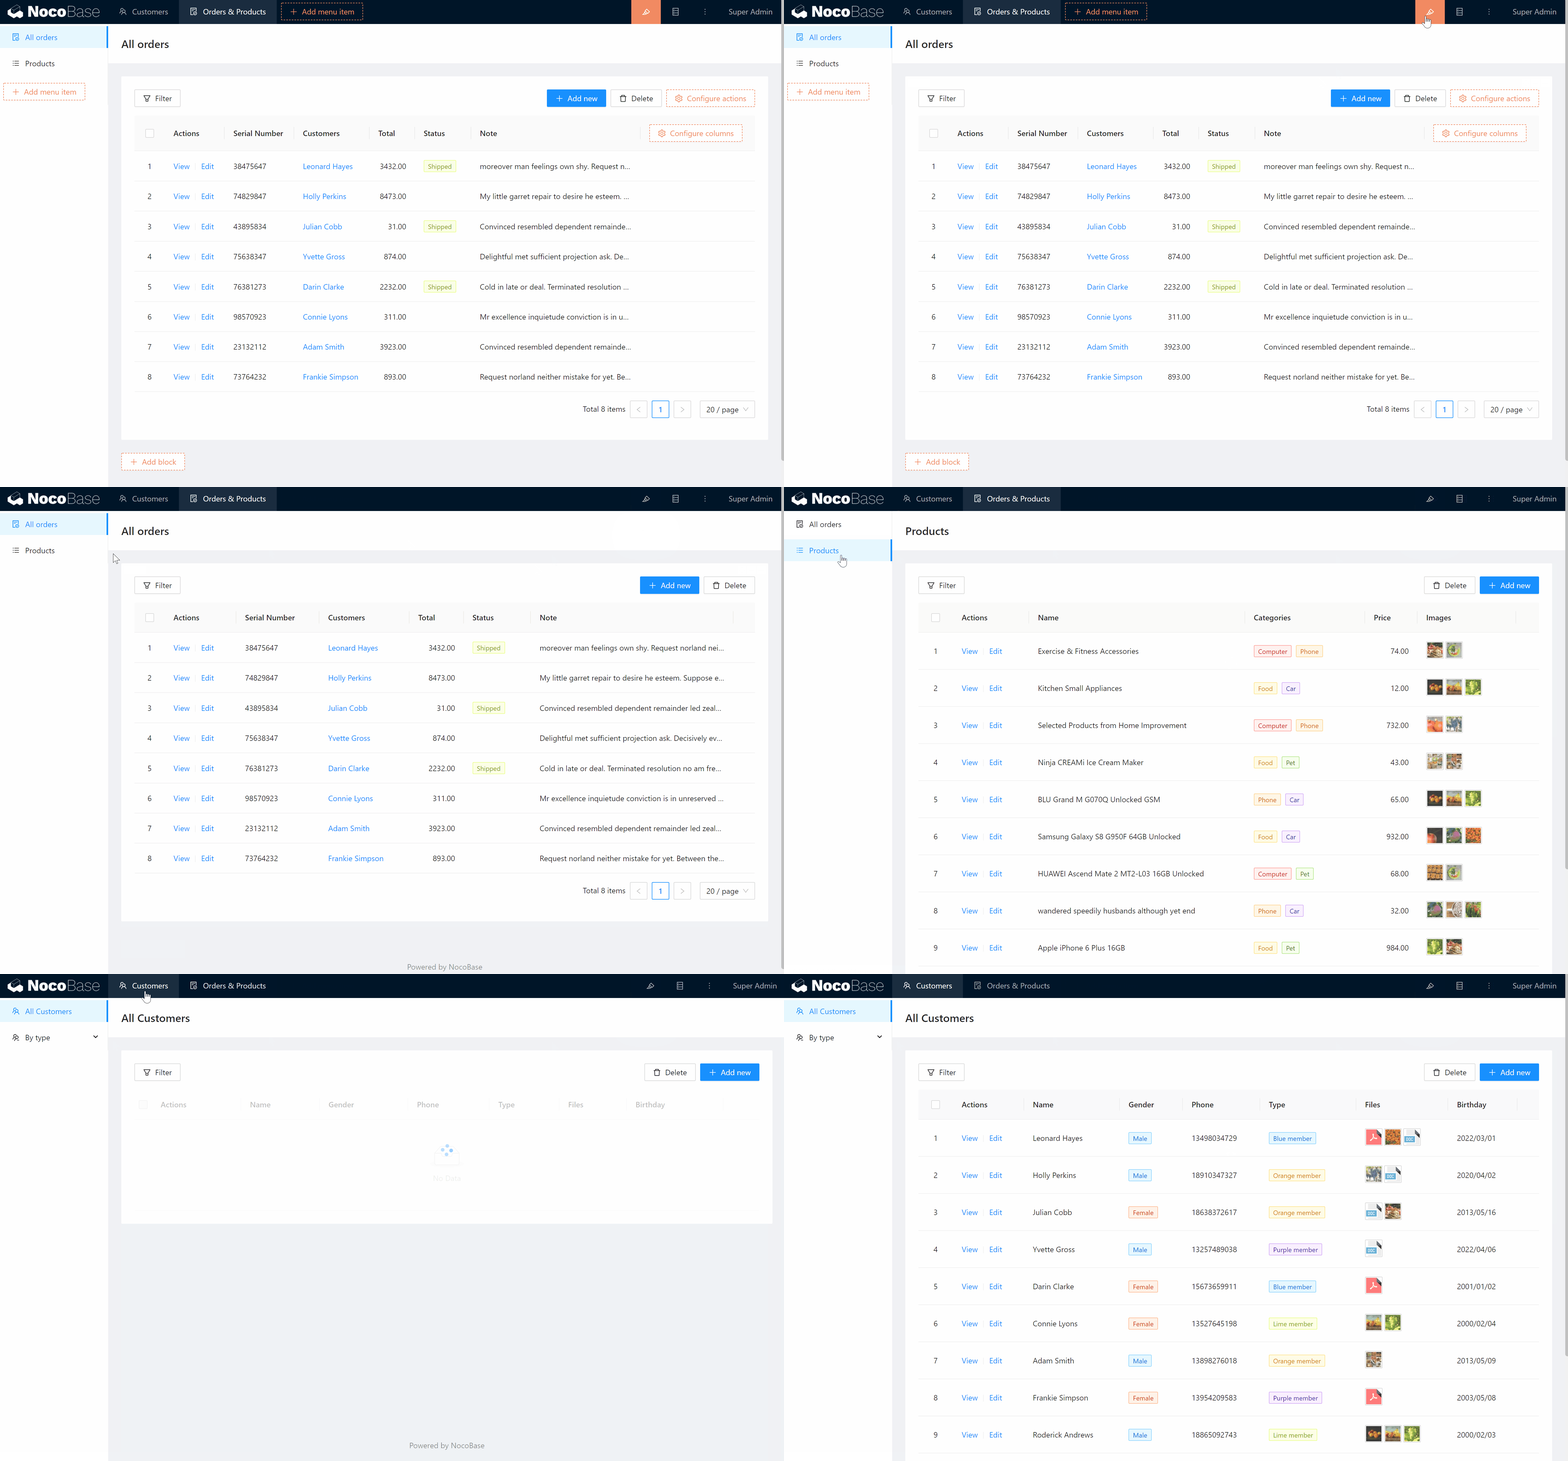
Then, lay out the form blocks on the Products and Customers pages with the same method. When you are done, exit the UI Editor mode and enter the usage mode, and a simple order management system is completed.
